本文共 17020 字,大约阅读时间需要 56 分钟。
最近在回顾数据结构,想到JDK这样好的代码资源不利用有点可惜,这是第一篇,花了心思。篇幅有点长,希望想看的朋友认真看下去,提出宝贵的意见。 :)
类继承体系图

内部原理
ArrayList 的3个字段
private transient Object[] elementData; //对象数组,用于存储 持有对象的 引用 private int size; //代表了 ArrayList 的长度。随着插入 删除 添加 而改变。 protected transient int modCount = 0; //从AbstractList继承得到,这个字段最后介绍,先忽视它。
ArrayList保存的真的是对象吗?
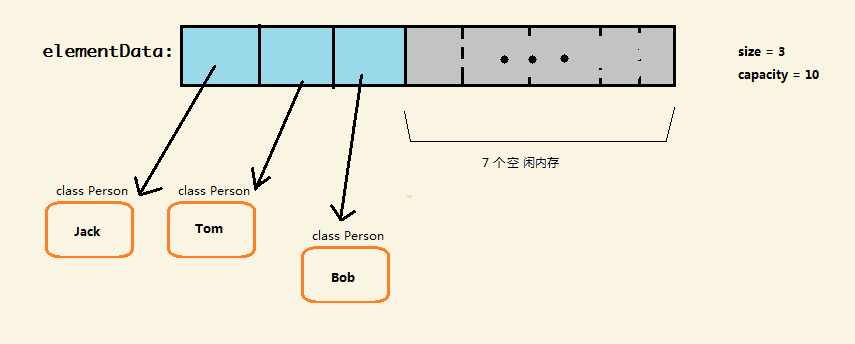
elementData 是一个Object 数组,这是为了兼容任何类型(Java泛型是所有实际类型共享一份代码模板的!!!)。数组保存的实质是持有对象的引用(reference)。引用又可以理解为 对象的“遥控器”(如下图)。
从底层点的角度说,引用实质是指针的化身,因此ArrayList即便持有很多个对象,其本身(或者说elementData 数组)保存的只不过是引用而已,内存开销不会太大。
所以要强调的是:对于保存引用类型,java中的数组,和各种集合类,持有的是对象的引用,而不是对象本身。

构造函数
空ArrayList 的优化 : new 一个空的ArrayList是很常见的做法,为了不让每个空ArrayList都创建一个空数组实例,ArrayList内部有一个用于共享,静态的空数组对象。当创建空的ArrayList时,内部的 elementData 就会指向这个共享的空数组: EMPTY_ELEMENTDATA
同时也会发现:当new 一个空ArrayList 时,不会马上在内存中分配 DEFAULT_CAPACITY =10 个长度的elementData数组,而是等到第一个元素被添加时,才会去申请分配默认长度 为10 的elementData 数组。
private static final Object[] EMPTY_ELEMENTDATA = {}; //用于所有空ArrayList共享的 空数组,注意它是静态字段。 private static final int DEFAULT_CAPACITY = 10; //第一次分配容量时,默认的初始容量大小// public ArrayList() { super(); this.elementData = EMPTY_ELEMENTDATA; //指向空数组} 
当然,如果在new 时指定了 初始容量initCapacity,就会立刻 创建一个 长度为 initialCapacity 大小的 elementData 数组

public ArrayList(int initialCapacity) { super(); if (initialCapacity < 0) throw new IllegalArgumentException("Illegal Capacity: "+initialCapacity); this.elementData = new Object[initialCapacity];} 
也可以从另一个一个集合构造

public ArrayList(Collection c) { elementData = c.toArray(); size = elementData.length; // c.toArray might (incorrectly) not return Object[] (see 6260652) if (elementData.getClass() != Object[].class) elementData = Arrays.copyOf(elementData, size, Object[].class);} 
容量增长策略
虽然ArrayList 号称 动态数组,其长度自动调整,但是内部 保存持有对象的引用的数组elementData却是一个普通的数组(Java数组的长度是不可变的),因此,ArrayList就必须实现容量扩展操作,在elementData 满 时,让elementData指向长度更大的数组。
以保证在任何时候:elementData.length >= size
elementData 的长度就 是 ArrayList 的容量(capacity)。
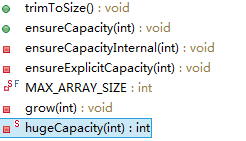
以下是关于容量调配的API(绿色标记的是public方法,红色的是private)

查看源码时,我发现,向ArrayList 中添加新元素的时,都会先 使用 ensureCapacityInternal 这个函数去检查容量是否够用。如图中,参数为 size+1 ,也就是要保证容量至少为size+1个,这样新元素才能放得下。我们去看看这个函数的实现。


/*函数作用:用于确保 ArrayList 的容量至少有 参数指定的minCapacity个*/ private void ensureCapacityInternal(int minCapacity) { if (elementData == EMPTY_ELEMENTDATA) { //这个if用于处理 往 空ArrayList中添加第一个元素时的情况 minCapacity = Math.max(DEFAULT_CAPACITY, minCapacity); } ensureExplicitCapacity(minCapacity); //内部又委托了这个函数,继续往下看 } 

/*函数作用:用于确保 ArrayList 的容量至少有 参数指定的minCapacity个*/private void ensureExplicitCapacity(int minCapacity) { modCount++; // overflow-conscious code if (minCapacity - elementData.length > 0) //如果当前容量 真的比 要求的 minCapacity 小 grow(minCapacity); //那就交给grow函数去扩张容量去吧。 } 
最终的增长逻辑都是委托grow() 方法实现的。只要调用了grow这个函数,就一定会使容量增加。我们来看看容量到底是怎么增加的。

private void grow(int minCapacity) { // overflow-conscious code int oldCapacity = elementData.length; int newCapacity = oldCapacity + (oldCapacity >> 1); //先让 newCapacity = 原来的1.5倍,这是默认的增长策略。 //再接着来判断这个策略是否合适 if (newCapacity - minCapacity < 0) //如果变为原来的1.5倍还是不够 newCapacity = minCapacity; //那就要多少给多少吧。 if (newCapacity - MAX_ARRAY_SIZE > 0) //如果要求的容量超大,(大于MAX_ARRAY_SIZE),这个时候就必须慎重。怎么办? newCapacity = hugeCapacity(minCapacity); //交给 hugeCapacity函数去决定到底给多少,这个函数会返回 MAX_ARRAY_SIZE 或者 Integer.MAX_VALUE。 elementData = Arrays.copyOf(elementData, newCapacity); //经过一轮轮的判断,终于定下了新的容量,好,调整elementData的容量为 newCapacity! } 
总结如下,有3种情况:
注:newCapacit 为需求容量,oldCapacity原来的容量
1、oldCapacity < newCapacit <= oldCapacity * 1.5 平缓增长的正常情况。例如原来容量为10 ,现在期望达到11个,则会扩展 调整到 10 + (10 >> 1) =15个 ,也就是变为 原来的1.5倍。 2、oldCapacity*1.5 < newCapacit <= MAX_ARRAY_SIZE 默认的1.5倍增长还不够,期望的容量有点大。例如原来容量为10 ,现在请求100个,那么就会实打实的扩展到 100 个的容量。 3、MAX_ARRAY_SIZE < newCapacit <= Interger.MAX_VALUE 极端情况,期望的容量超大 。在这个情况下,newCapacity的值最终是由hugeCapacity函数决定的,它会返回 MAX_ARRAY_SIZE 或者 Integer.MAX_VALUE
而 MAX_ARRAY_SIZE是一个比Integer.MAX_VALUE 小8 的数 ,为什么要小8呢,我很奇怪。看了注释解释大致如下。
//有些Java虚拟机会在数组内存的头部保留 一些字节的容量来存储这个内存块的相关信息,因此,数组的 安全最大长度是 : Integer.MAX_VALUE - 8private static final int MAX_ARRAY_SIZE = Integer.MAX_VALUE - 8;
所以,ArrayList 的最多容量不要超过 MAX_ARRAY_SIZE (Integer.MAX_VALUE - 8) , 也就是 2147483639 个 (疯子才会使用这么多吧),否则是会抛异常的。
下面还有2个是公开的接口
公开接口:避免多余的浪费,让容量裁剪为和size一样大
public void trimToSize() { modCount++; if (size < elementData.length) { elementData = Arrays.copyOf(elementData, size); } }
公开接口:一次性决定ArrayList 的最大容量,避免半路上不断的调整容量带来开销(如果你真的很确定你需要的ArrayList 的最大长度,否则没必要)

public void ensureCapacity(int minCapacity) { int minExpand = (elementData != EMPTY_ELEMENTDATA) // any size if real element table ? 0 // larger than default for empty table. It's already supposed to be // at default size. : DEFAULT_CAPACITY; if (minCapacity > minExpand) { ensureExplicitCapacity(minCapacity); } } 
总结:默认情况下,ArrayList 平缓增长时,每次增长为原来的容量的1.5倍。
顺序表的短板:插入和删除
先看一道试题:
在java中,下面哪一个复制数组的方法最高效?
A、循环赋值
B、Arrays.copyOf
C、System.arraycopy
D、clone
正确答案: C
这个函数让我想到了C语言标准库中的 memmove 函数,它们的功能真的很像。而且 System.arraycopy 是 native方法,实现会不会就是 memmove 呢???也许吧,可惜我看不到源码。下面介绍 System.arraycopy这个函数。

public static native void arraycopy(Object src, int srcPos, Object dest, int destPos, int length); /*从数组src中拷贝元素到 dest中 。我们把src数组叫做源数组,把dest数组叫做目的数组 src 源数组的引用 srcPos 源数组的拷贝起始索引 dest 目的数组的引用 destPos 目的数组的拷贝起始索引 length 有length个元素会被拷贝 如果参数 src 和 dest 引用相同的数组对象(注意,它允许内存重叠),则复制的执行过程就好像首先将 srcPos 到 srcPos+length-1 位置的组件复制到 一个带有 length 组件的临时数组,然后再将此临时数组的内容复制到目标数组的 destPos 到 destPos+length-1 位置一样。 这就好像是C语言标准库中的memmove 使用注意: 1、src 和 dest不能为null,否则会抛出NullPointerExcaption异常 2、src和 dest 的类型要兼容或者一样。 3、你必须精确把握好起始索引和拷贝长度的关系,有差错就是抛异常。 */

ArrayList在删除和插入 移动数组元素时,就是使用的这个API。我们来看看。
插入元素
插入一个元素到指定位置

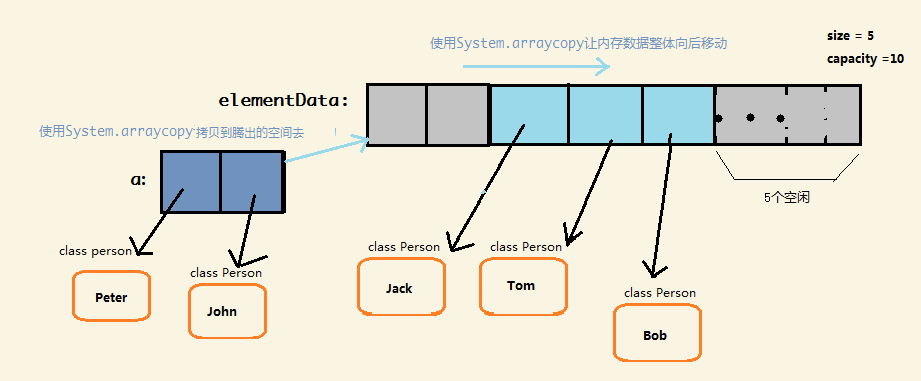
public void add(int index, E element) { rangeCheckForAdd(index); //检查index 的合法性:逻辑如下 ,后面不再列出 /* if (index > size || index < 0) throw new IndexOutOfBoundsException(outOfBoundsMsg(index)); */ ensureCapacityInternal(size + 1); // 确保容量足够 //elementData 的元素的移动,让出空间 System.arraycopy(elementData, index, elementData, index + 1,size - index); elementData[index] = element; //插入新的元素的引用 size++; } 
插入一个集合的元素到指定的位置

public boolean addAll(int index, Collection c) { rangeCheckForAdd(index); //index 合法性检查 Object[] a = c.toArray(); //先转化为数组 int numNew = a.length; ensureCapacityInternal(size + numNew); // 确保容量足够 int numMoved = size - index; if (numMoved > 0) //原来的数组让出空间 System.arraycopy(elementData, index, elementData, index + numNew, numMoved); //将新的元素拷贝到腾出的空间去。 System.arraycopy(a, 0, elementData, index, numNew); size += numNew; return numNew != 0; } 
画个图打开你的脑洞(插入2个元素的集合到ArrayList 的开头)


删除元素
从集合中删除元素只是让保存这个对象的引用为null,让GC却确定什么时候清理这个对象。因为java没有free , delete 。
删除所有的元素 clear

/* 清空ArrayList中的所有持有对象。让size为0. 实质操作是让保存持有对象的引用的数组elementData 的元素全部为null。 所以我们会试想:如果在清空操作后 ,没有其它引用指向ArrayList原来持有的对象了,那么这个对象就会等待被GC 回收。 例子: ArrayListarr = new ArrayList (); Person p1 = new Person(); arr.add(p1); //添加第一个持有对象 arr.add(new Person()); //添加第二个持有对象,匿名的。 arr.clear(); //第一个持有对象因为还有引用p1 的指向,所以暂时不会等待GC回收 //第二个对象由于没有引用指向。则会等待GC回收。 */ public void clear() { modCount++; // clear to let GC do its work for (int i = 0; i < size; i++) elementData[i] = null; size = 0; }

按对象删除:删除第一个找到的元素,立刻返回。如果没找到,则什么也不做,返回false 。如果o不为null,则调用equals方法去查找。时间复杂度为O(n)。

public boolean remove(Object o) { if (o == null) //如果要删除null { for (int index = 0; index < size; index++) if (elementData[index] == null) //从前往后遍历查找,一旦找到为null ,删除之,返回 { fastRemove(index); //fastRemove 是对 System.arraycopy 的封装 return true; } } else //如果要删除某个真实存在的对象 { for (int index = 0; index < size; index++) if (o.equals(elementData[index])) //从前往后遍历查找,一旦找到,删除之,返回 { fastRemove(index); //fastRemove 是对 System.arraycopy 的封装 return true; } } return false; } 
按索引删除:删除指定索引上的元素。主要耗时是在System.arraycopy 的执行上 。

public E remove(int index) { rangeCheck(index); modCount++; E oldValue = elementData(index); int numMoved = size - index - 1; if (numMoved > 0) System.arraycopy(elementData, index+1, elementData, index, numMoved); elementData[--size] = null; // clear to let GC do its work return oldValue; } 
只保留 ArrayList中 和 集合c 相同元素,其它的都删除。相同是指调用equals返回 true (或者都是null)
public boolean retainAll(Collection c) { return batchRemove(c, true); }
删除 ArrayList中 和 集合c 相同元素。相同是指调用equals返回 true (或者都是null)
public boolean removeAll(Collection c) { return batchRemove(c, false); }
追加元素
追加一个元素到末尾
public boolean add(E e) { ensureCapacityInternal(size + 1); // 确保容量足够 elementData[size++] = e; return true; }
追加一个集合的元素到末尾

public boolean addAll(Collection c) { Object[] a = c.toArray(); int numNew = a.length; ensureCapacityInternal(size + numNew); // Increments modCount System.arraycopy(a, 0, elementData, size, numNew); size += numNew; return numNew != 0; } 
小结:
1、如果你需要将一个数组拷贝到另一个数组中,或者在一个数组中局部移动数据,优先使用System.arraycopy 这个高效的native方法
2、如果你需要调整数组的大小,请使用Arrays.copyOf
GET / SET

//对数组访问的简单封装。方便访问,避免重复的cast操作。是默认的包访问权限 @SuppressWarnings("unchecked") E elementData(int index) { return (E) elementData[index]; } //获取某个位置上的元素。 public E get(int index) { rangeCheck(index); return elementData(index); } //设置某个位置上的元素。 public E set(int index, E element) { rangeCheck(index); E oldValue = elementData(index); elementData[index] = element; return oldValue; } 
查找元素

//ArrayList中是否包含某个对象 public boolean contains(Object o) { return indexOf(o) >= 0; } //返回第一个找到的对象的索引。找不到则返回-1 public int indexOf(Object o) { if (o == null) { //如果要找null for (int i = 0; i < size; i++) if (elementData[i]==null) return i; } else { //如果要找真实的对象 for (int i = 0; i < size; i++) if (o.equals(elementData[i])) //调用equals return i; } return -1; } //同上,只不过是从后往前查找。 public int lastIndexOf(Object o) { if (o == null) { for (int i = size-1; i >= 0; i--) if (elementData[i]==null) return i; } else { for (int i = size-1; i >= 0; i--) if (o.equals(elementData[i])) return i; } return -1; } 
与数组的转换
转化为数组,是指将ArrayList中的elementData 保存的对象引用全部拷贝到一个新的数组中去,而对象并没有拷贝。
提供了下面2个函数

public Object[] toArray() { return Arrays.copyOf(elementData, size);}@SuppressWarnings("unchecked")public T[] toArray(T[] a){ if (a.length < size) return (T[]) Arrays.copyOf(elementData, size, a.getClass()); System.arraycopy(elementData, 0, a, 0, size); if (a.length > size) a[size] = null; return a;} 
第一个用的很少,因为它返回的是Object数组。也就是 和 elementData 一模一样的一份拷贝。而我们往往需要的是实际类型的数组。
你可能会写下面这样的代码ArrayList在Java中,只有相互兼容,有继承关系,满足里氏转化原则的才能 转型(向下或者向上) 然而,Object [] 和String[]没有继承关系,而是处于同一层次的类型。这和他们保存的类型是否有继承关系无关。同样的道理,扩展到泛型中去,ArrayList<Object> 和 ArrayList<String> 也是不能转化的,不兼容的,因为类型擦除,这两个类型实际是相同的,都是ArrayList。arr = new ArrayList<>();arr.add("abc");String[] ss = (String[])arr.toArray(); //不可以,运行时异常!

因此,一般会使用第二个泛型方法
String [] ss = list.toArray(new String[0])
迭代器
关于迭代器的特点,用法,接口等这里就不详细介绍了,我直接进入主题。
为什么迭代过程中对ArrayList 的修改会抛异常?哪些是运行的?哪些不允许?

private static void bad(){ ArrayList arr = new ArrayList<>(); arr.add(0); arr.add(1); arr.add(2); Iterator iter = arr.iterator(); while(iter.hasNext()) { Integer ele = iter.next(); //取得当前迭代出的这个元素 if(ele.intValue() /2 !=0) //如果这个元素是奇数 arr.remove(ele); //则从表中删除它 } /*Exception in thread "main" java.util.ConcurrentModificationException * * * */} 
先放下问题,来研究一下modCount 和 Itr 这个成员内部类(ArrayList 的迭代器)
modCount 的值就是代表list 发生结构性修改的次数。 什么叫结构性修改呢?比如插入,删除,追加等导致 size改变 和搅乱ArrayList 的结构的操作。这个值主要用在ArrayLsit的迭代器中,用于检查迭代过程中表本身是否被意外的结构性修改。如果是,就会抛出 ConcurrentModificationException异常。protected transient int modCount = 0; //从AbstractList继承得到
下面的方法都会使得modCount 加1 ,还有其它的方法也会。。。


ArrayLsit 的 迭代器 Itr

1 private class Itr implements Iterator2 { 3 int cursor; // 下一个将被迭代出的元素的index 4 int lastRet = -1; // 上一次被跌带出去的元素的index,如果是-1,则不合法。 5 int expectedModCount = modCount; // 初始化为Arraylist对象的字段: modCount 6 7 public boolean hasNext() { //迭代终点检查器,如果返回true则可以继续迭代 8 return cursor != size; 9 }10 11 //在构造迭代器对象时,expectedModCount 的值被初始化为最开始的modCount。12 //这个函数的目的就是:检查从迭代前,到跌倒结束过程中,ArrayList 的 modCount 的值是否一直和迭代器的字段exceptedModeCount一样13 final void checkForComodification()14 { 15 if (modCount != expectedModCount)16 throw new ConcurrentModificationException();17 }18 19 public E next() { /*返回下一个将要被迭代出的元素*/20 checkForComodification(); //每次调用next 都会检查 modCount 和 expectedModCount是否一致21 int i = cursor;22 23 if (i >= size)24 throw new NoSuchElementException();25 Object[] elementData = ArrayList.this.elementData;26 if (i >= elementData.length)27 throw new ConcurrentModificationException();28 29 cursor = i + 1;30 return (E) elementData[lastRet = i]; //返回迭代出的元素,并且让lastRet为已经被迭代出的元素的index31 }32 33 public void remove() { /*删除迭代宿主 的 最近的一个已经 被迭代出的元素*/34 if (lastRet < 0) //这个判断是为了限制:必须先把要删除的元素通过next迭代出来,才能再调用remove删除它35 throw new IllegalStateException(); //请看第43行,又把它重置为 -1 。只有next的调用才会把它赋值为合法的index。(30行)36 37 38 checkForComodification();39 40 try {41 ArrayList.this.remove(lastRet); //直接调用了 宿主的remove 方法删除元素42 cursor = lastRet;43 lastRet = -1; 44 expectedModCount = modCount; //再让exceptedModCount 和modCount 保持一致,这样就避免了next()抛异常45 46 } catch (IndexOutOfBoundsException ex) {47 throw new ConcurrentModificationException();48 }49 }50 51 52 53 }

可以发现,抛出异常的根本是: modCount != expectedModCount 。 而迭代器构造时,expectedModCount= modCount,所以在迭代过程中,如果我们不使用ArrayList的改变modCount 的方法,就不会抛出异常。难道我们就必须这样小心翼翼吗?不,如果要删除ArrayList 的元素,我们可以使用迭代器的remove方法。如下:
(为什么这样就不会抛异常呢?请看上面代码的44行,做了重新赋值操作)

private static void ok(){ ArrayList arr = new ArrayList<>(); arr.add(0); arr.add(1); arr.add(2); Iterator iter = arr.iterator(); while(iter.hasNext()) { if(iter.next().intValue() /2 !=0) //如果是奇数 iter.remove(); //通过迭代器把它删除是OK的 } System.out.println(arr); } 
同样,Java 5 引入的foreach 也是如此,因为foreach只不过是对迭代器的语法包装。编译后,实质还是调用了迭代器的方法。
for(Integer i : arr){ if(i.intValue() / 2!=0) arr.remove(i); //同样抛异常,foreach本质就是使用迭代器}
其它

/*获得ArrayList 的size */public int size() { return size;} /*获得ArrayList 是否为空 */public boolean isEmpty() { return size == 0;}//clonepublic Object clone() { try { @SuppressWarnings("unchecked") ArrayList v = (ArrayList ) super.clone(); v.elementData = Arrays.copyOf(elementData, size); v.modCount = 0; return v; } catch (CloneNotSupportedException e) { // this shouldn't happen, since we are Cloneable throw new InternalError(); }} 
转载地址:http://oypf.baihongyu.com/